SkEye Guide
Written for SkEye version 9.0.x.
Feb 2023
Introduction
SkEye is a planetarium app which can display a dynamic map of celestial objects, as seen by an observer on Earth.
With the help of appropriate sensors, the map can be scrolled automatically as the device is moved. If the device is attached to a telescope, SkEye can also help guide the scope's movement.
Goal
SkEye's goal is to provide information about celestial objects in a compact form. The focus is not on fancy
graphics. It is likely that a fancy or realistic rendering of the map might satiate the user's curiosity too early and not
motivate them to experience the real skies by themselves.
Versions
There are two versions of SkEye:
- The beginner version, which is free. This version is suitable for those who don't have any astronomical gear or are just getting started in the hobby. This version should provide enough features to keep you interested for an year (or more) of sky gazing.
- The Pro version, which is geared towards the Proficient user.
This guide applies to both versions. Wherever there is a difference between the versions, it is noted.
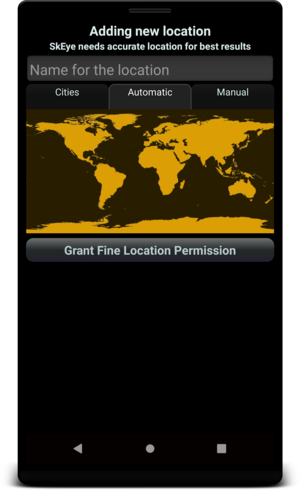
Add Location screen
You will be prompted for your location when you first start the app. Specify your precise location for maximum accuracy.
The locations you specify are remembered so that you can switch between them quickly. And alignments are remembered separately for each location.
Automatic
It is recommended to use the automatic mode whenever possible to specify the location. This mode uses data from navigation satellites to get your precise location. You will need to grant the "Location permission" for this mode.
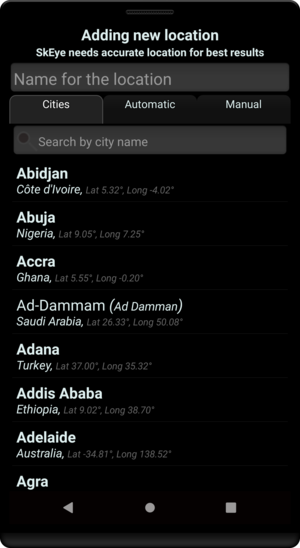
Popular cities
For a quick start, you can pick a nearby city from the list of popular cities in the Cities tab.
Manual
If you specify the location manually, note that the input is in decimal degrees. Hence, a latitude of 15°30' should be entered as 15.5 and not 15.3! You can use Google Maps to find the co-ordinates of your location.
Home Screen
The home screen gives you quick access to settings and shows a list of objects / events that are visible in the sky at the present moment.
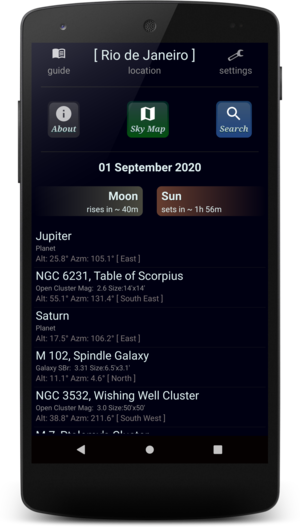
On this screen,
- The location is shown prominently at the top since it is important to ensure that it is set correctly.
- Clicking the
Sky Mapbutton will launch the Map screen - Clicking the
Searchbutton will launch the Search screen - Clicking the object names such as
Moon,Sun, orJupiterwill show the details for the object.
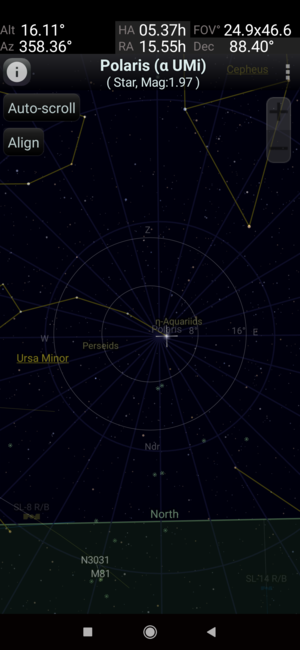
Map Screen
This screen shows a dynamic and localised 360° map of the sky. If appropriate sensors are available (see requirements), the map will point where your phone / tablet is pointing and automatically scroll as you move your device.
Gestures supported on the map
- Drag on the map to manually scroll it
- Double-tap anywhere on the map to bring up the menu
- Pinch and twist to zoom and rotate the view
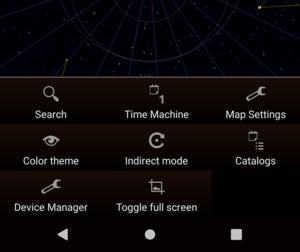
Menu
The map screen's menu can be brought up by either
- Double-tapping anywhere on the map
- Clicking the "three dots" button on the top-right of the map.
It looks like this:
Position
The top part of the map screen shows where the center of the map is pointing towards.

FOV stands for Field of View, an indication of the visual area of the map.
For other abbreviations, see co-ordinate systems.
Object summary
Just below the position section, is the object summary section. The object on the map that is closest to the center of the map is automatically selected by SkEye, and its summary (name and type) is shown.
There is also an info button beside the summary, which when clicked, launches the object details dialog.
Time Machine
With the time machine you can:
- jump to a given date and time. Currently, a range of ± 100 years is supported.
- speed up or reverse the flow of time
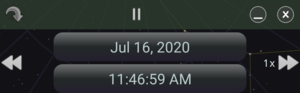
In the top section, the four buttons from left-to-right are:
Jump to Nowbutton.PauseorPlaytoggleMinimisebutton, which minimises the UI but keeps the time machine activeClosebutton, which disables the time machine and closes the UI
In the bottom section, the buttons from left-to-right are:
Rewindbutton which makes the time machine to run in reverse. It can be pressed multiple times to increase the speed.DateandTimebuttons to set the calendar date and timeFast forwardbutton which makes the time machine to run forward. It can be pressed multiple times to increase the speed.
Search
You can search for any object in the database. To start the search
- on the
Homescreen click the search button or - on the
Mapscreen clickMenu->Search.
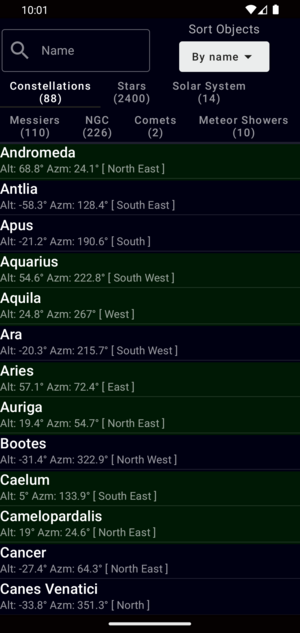
Note: the objects that have a green background in the list are above the horizon.
The objects can be sorted in two ways:
- alphabetically or
- by ease of viewing (which takes into account the visibility measure and present altitude of the object)
After selecting the object to search, an arrow is shown on the map to guide you towards the target.
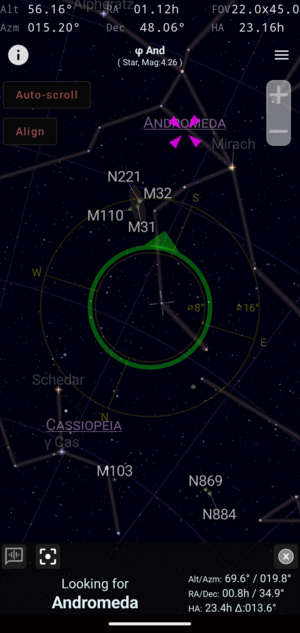
In the above image, the arrow indicates that the device needs to be tilted upwards to reach Andromeda.
Also shown are the target's co-ordinates and the delta (Δ) angle between the current position and the target.
Settings screen
You can access this screen via Home screen -> Settings -> More.
General Settings
Zoom by Volume keys
When this feature is on, the map view can be zoomed using the volume keys.
Magnetic field warning
When enabled, SkEye checks the output of the magnetometer and if it is not as expected, it shows the "Strange Magnetic field" warning. See the section on magnetometer for more information.
Auto-rotation of labels
If enabled here, the labels on the Map view will rotate along with your phone when in
- hand-held mode
- indirect mode
Principal Orientation
The default orientation of SkEye's main screen is portrait. But if you prefer landscape, you can change it here. There is also an “Auto” mode which changes the orientation dynamically to match the phone's orientation.
Sensor related settings
Use sensor fusion
Sensor fusion is a feature available on some Android devices. It "fuses" the data from multiple sensors and provides a more stable experience. It is recommended to keep this setting on, except when there is a bug in the Sensor fusion of the device.
Sensitivity settings
Each Android phone model has slightly different sensors (types and sensitivity). If you find the display too jerky or too laggy, SkEye lets you alter the sensitivity of each sensor. See sensitivity for more details.
Catalog filters
This feature is only available in the Pro version.
In the free version, the database is small enough to not need filtering. However, the Pro version has a lot more objects which can be distracting / intimidating to the user.
Hence, the Pro version allows filtering of the objects. The objects thus filtered out are neither shown in the sky map, nor in the search screen.
The filters can be accessed via
Home->Settings->CatalogsMap->Menu->Catalogs
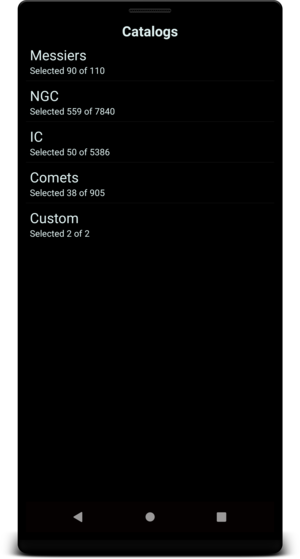
Clicking a catalog name will bring up the filter for that particular Catalog.
DSO Filters
For the Messier, NGC and IC catalogs, you can filter objects based on an their Size and Surface Brightness
/ Apparent Magnitude. In the case of Open Clusters, their Apparent Magnitude is used instead of Surface Brightness.
See Visibility Measures for more details.
The filter dialog for these catalogs has two tabs:
- List of objects
- Draggable sliders to control the filter
The list tab
The list tab looks like this:
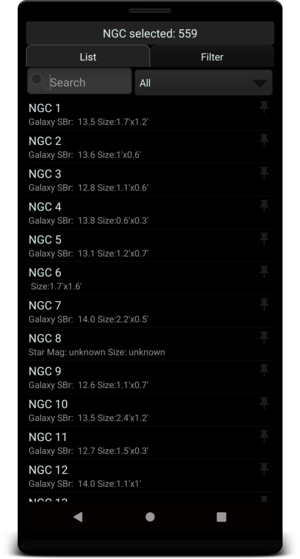
Here you can see the following lists of objects:
- All
- Accepted by the filter
- Rejected by the filter
- Unfilterable objects, such as those without a size or magnitude specification
When you click an object from these lists, the object will toggle between pinned / unpinned state.
Pinned Objects
A pinned object will always be selected, regardless of the filter settings.
The Filters tab
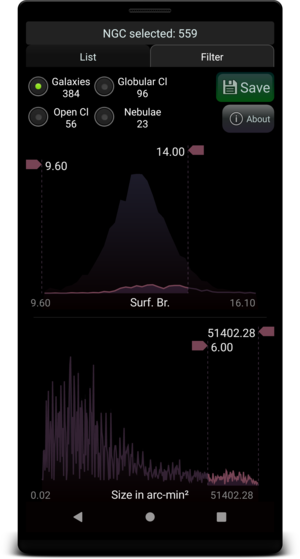
You can drag the sliders left or right to choose the minimum and maximum range of the measure.
Note: Be sure to click
Savebefore quitting the screen, else your changes will be discarded.
Object details
This dialog is shown when you click
- the object name on the Home Screen
- the
infobutton on the Map Screen

Currently, this dialog shows the following details of the object:
- Type
- Magnitude / surface brightness
- Distance from Earth
- Altitude Plot
- Equatorial and Alt-Az co-ordinates
- A button to search within the App
- A button to search Wikipedia
Altitude Plot
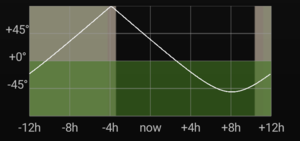
This is a plot of the object's apparent altitude v/s time.
The horizontal axis represents time and is centered on now. It extends left wards to -12 hours and right wards to
+12 hours. The vertical axis represents the altitude in degrees.
The line graph shows the altitude of the object for the corresponding time on the horizontal axis.
The background color indicates the sky's background illumination from the Sun at the given time. The green background below 0° indicates the ground.
Color Themes
The color theme of the app can be changed from
Home Screen->Settings->Color ThemeMap Screen->Menu->Color Theme
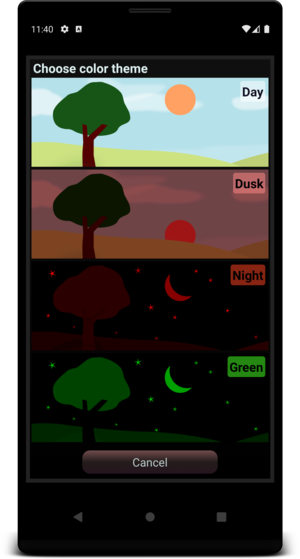
There are four color themes to choose from:
| Theme | Colors | Navigation Buttons |
|---|---|---|
Day | Bright colors suitable for use in daylight | No dimming |
Dusk | Green and Blue colors are subdued by about 50% | Dimmed |
Night | Only Red color is used | Dimmed |
Green | Only Green color is used | Dimmed |
The Night color theme is designed to preserve dark adaptation.
The Green color theme can be useful in certain scenarios like observations under a bright full moon.
Note: The above color theme only applies to the app and not to OS provided windows such as the onscreen keyboard. It is a good idea to change your keyboard theme to a dark one, to avoid being suddenly blinded when the keyboard pops up within the app. Android 10+ also introduced a system-wide
Dark Themeoption, which is a great way to make all such windows dark by default.
Catalogs
To render the map, SkEye keeps several catalogs of celestial objects:
- Named Star Catalog (bright stars with popular names)
- Unnamed Star Catalog (fainter stars which only have scientific designations)
Solar system catalogwhich currently includes the Sun, the Moon and the major planetsMessier catalogof deep sky objects- Selected
Meteor Showers
The free version includes:
- 200+ Selected NGC objects
- Selected bright comets
The Pro version includes:
- Full NGC and IC catalogs
- Artificial Earth Satellites, or simply
Satellites - About 800 of the topmost visible Comets
- Ability to specify a custom catalog
The Messier Catalog
The Messier objects are a set of 110 astronomical objects catalogued by the French astronomer Charles Messier in his Catalogue des Nébuleuses et des Amas d'Étoiles ("Catalogue of Nebulae and Star Clusters").
This catalogue of objects is one of the most famous lists of astronomical objects, and many Messier objects are still referenced by their Messier number.
The catalogue includes deep-sky objects that can be observed from Earth's Northern Hemisphere; many Messier objects are extremely popular targets for amateur astronomers.
Note that only 108 of the 110 Messier objects are visible in the Pro version. This is because two Messier objects are anomalous and hard to categorize:
- M40 is a binary star
- M24 is pseudo-cluster of stars (not an actual cluster of stars that are tied together gravitationally)
See this note for more info.
The NGC Catalog
The New General Catalogue of Nebulae and Clusters of Stars (abbreviated as NGC) is a catalogue of deep-sky objects compiled by John Louis Emil Dreyer in 1888.
It has undergone various revisions and updates since then.
SkEye uses data from the RNGC/IC catalog maintained by Wolfgang Steinicke.
IC catalog
The first major update to the NGC is the Index Catalogue of Nebulae and Clusters of Stars (abbreviated as IC), published in two parts by Dreyer. It serves as a supplement to the NGC, and contains an additional 5,386 objects, collectively known as the IC objects.
Like the NGC catalog, it has undergone various revisions.
SkEye uses data from the RNGC/IC catalog maintained by Wolfgang Steinicke.
Satellites
The Satellite catalog helps track artifical Earth Satellites.
The Pro version includes a catalog of 100+ brightest satellites sourced from Celstrak.
Note: The satellite database is currently bundled along with the app, and can't be updated by the user. See this note for future plans.
Comets
The Pro version includes a catalog of about 800 top-most visible comets.
The comet data comes from Minor Planet Center.
Note: The comet database is currently bundled along with the app, and can't be updated by the user. See this note for future plans.
Custom Catalog
Note: This feature is only available in the Pro version.
With this feature, the user can create their own list of objects, and import the list into SkEye.
The list needs to be stored in Comma Separated Values (CSV) format, which is a simple text file format, in which rows are stored on
separate lines and columns are separated by a comma (,). Most spreadsheets can be exported into CSV format.
Such a CSV file can be created by the user and stored directly on the phone or on a cloud storage provider (such as Google Drive).
To import the file into SkEye, open the Custom Catalog config screen and click the import button:
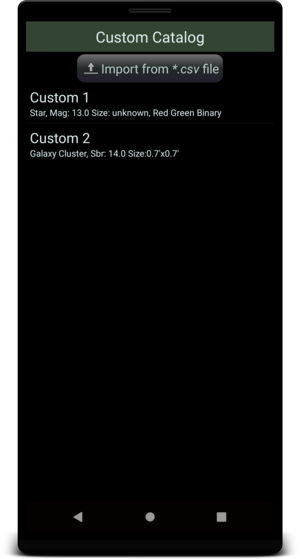
If the import is successful, a list of imported objects will be shown.
Note: Any lines beginning with
#will be ignored. You can use this feature to add comments and headers to your CSV file.
Column Format
- Object Name
- Object Type
- RA in
hours:minutes:secondsformat, J2000 Epoch - Declination in
degrees:arc-minutes:arc-secondsformat, J2000 Epoch - Magnitude (optional)
- Surface Brightness (optional)
- Major-size in arc-seconds (optional). This is the major axis of the ellipse representing the object
- Minor-size in arc-seconds (optional). This is the minor axis of the ellipse representing the object
- Position angle in degrees (optional). This is the angle that the major axis makes with the North Celestial Pole.
- Short description (optional).
Sample CSV file
This link points to a sample CSV file that can be imported into SkEye.
You can use it as a base for creating your own catalog.
Virtual DSC
This feature helps convert your telescope into a PUSHTO telescope, easily and quickly, with a fair level of accuracy.
You just need to mount your Android phone on the Telescope's OTA, and add one alignment.
What is DSC?
DSC stands for Digital Setting Circles. Real DSCs are implemented using optical or magnetic encoders in the mount
and are quite accurate (typically within 5 arc-minutes on an amateur setup). However they are costly and cumbersome to install.
In contrast, the Virtual DSC mode in SkEye uses only the sensors in your device, and installation is much easier.
Advantages over a real DSC
-
Cheaper (if you already own an Android device)
-
Isn't affected by mounting errors.
-
Quicker to install and get started
-
Less messy (no wires, batteries, etc)
Disadvantages
Although, complete accuracy is possible under ideal conditions, in reality, there are errors introduced from
the sensors. Hence, Virtual DSC can sometimes be less accurate than a real DSC.
The main source of the inaccuracy is in the magnetic field measurement. See the chapter on Magnetometers for more details.
SkEye 9.x has a new feature called GyroAssist which improves the accuracy by using the Gyroscope to predict the pointing. The Gyroscope tends to have better accuracy over a short time period, ranging from a minute to about 20 minutes. This still depends on the magnetometer for initial bootstrapping of the alignment, so there is a still an element of inaccuracy in the system.
Despite the errors, I have found this method to be accurate, at times, to about 15 arc-minutes with single point alignment.
More typically, you can expect about half-degree (30 arc-minutes) accuracy with a well planned setup and under ideal conditions. YMMV!
For best accuracy, you can consider using the SkEye-Cam app instead, which "solves" the images captured via the camera.
Tutorial for Virtual DSC
Since SkEye is the only application (that I know of) with a Virtual DSC
feature, here's a detailed step-by-step guide for using it. It's
actually quite simple to use once you get familiar with it.
Prepare your phone
-
Make sure the phone's system time is accurate to within a minute (if not seconds). You can use, for example, the Navy Time application to verify system time accuracy. (See Appendix A for more details)
-
Start the
SkEyeapplication and setup your location accurately. -
Calibrate the magnetometer as described in this section.
-
Now attach the phone to the OTA, as described below.
Attach to telescope
- You need to attach your phone to the telescope's Optical Tube Assembly (OTA), such that the phone moves whenever the OTA moves. See figure below for an example.
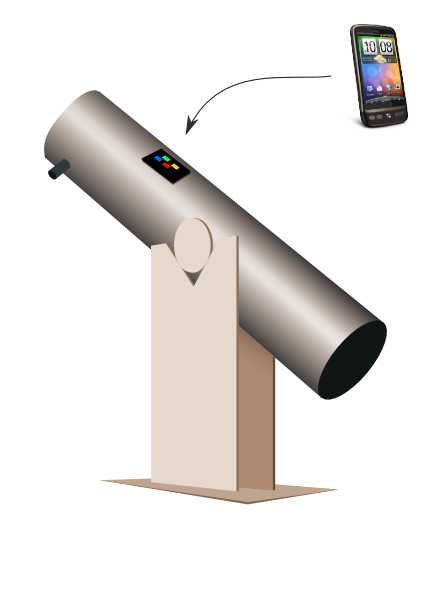
-
You can use a phone jacket (or case, holster, etc) and attach the jacket permanently to the OTA. That way, you can “plug-in” the phone quickly when needed. To attach the jacket to the OTA you can use, for example, Velcro or two sided tape.
Checkout several ideas contributed by users on my website.
-
The direction in which you attach doesn't matter. The type of mount doesn't matter either. Attach in such a way that the display is conveniently visible and operable.
-
You will get best results if your telescope doesn't have steel1 tubes or mounts, since they cause magnetic interference. If they do, try to attach the phone farthest from the metallic content.
-
Try to observe from a location where there is little magnetic interference, for example, keep away from electric poles and wires, large buildings or steel railings.
First Alignment
Choose a bright and well-known star/planet for your first alignment.
Click Menu button → Indirect Mode → Add new Alignment. You will see a
list of objects sorted by their “ease of viewing”. SkEye prioritizes
objects by their current altitude and visual magnitude.
Chose one of these objects and a dialog will show up asking for confirmation:
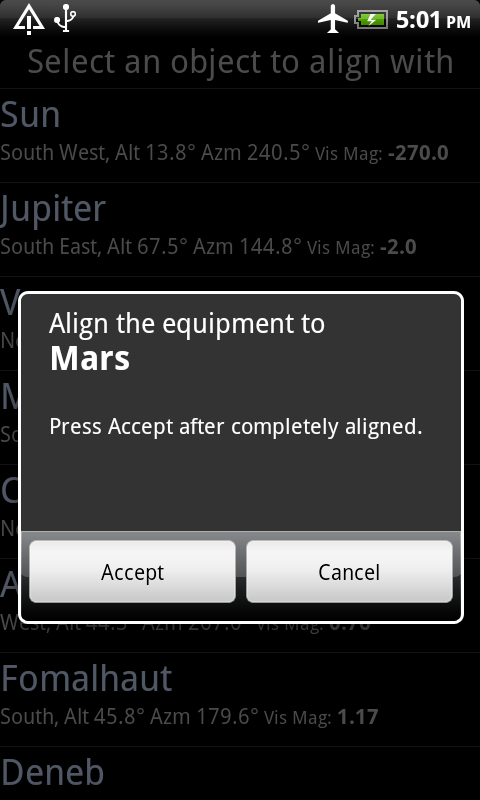
Now move your telescope so that this object is centered in the field-of-view. Only then, press Accept. Keep the telescope stationary for a few seconds, after clicking Accept. The alignment is done!
To help you to center the star in the field-of-view you can use an illuminated reticule eyepiece. If you don't have that you can use a high-power eyepiece and defocus it so that the star appears like a blob. Centering a large blob of light is easier than centering a pin-point source of light.
When you return from the Indirect-mode screen to the Map screen, the object you selected in the previous step should now appear in the center of the cross-hairs.
If you move the telescope now, you will see the display changing in tandem! You can now try finding a few objects or do more alignments as described in the next section.
Adding more Alignments
You can add more alignments by repeating the procedure above, but SkEye
offers a quicker way to do this: Insta-Align. Here's how you use it.
Slew your scope to find another bright object. If there is a difference between the scope's view and the planetarium's view, you can simply drag the view until it is centered in the cross-hairs. The words Insta-Align will be shown along with a couple of buttons as in the figure below:
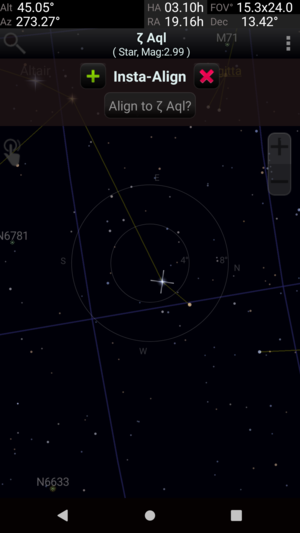
Once the object is centered, press the “+” button and you are done!
As a further shortcut, SkEye will show a button to align to the nearest
object. For example the “Align to Pollux” button in the figure. This is
handy and more precise than relying on your eyes to match the
cross-hairs.
To cancel the alignment procedure you can click the red “X” button, or simply move the telescope away.
You can add as many alignment points as necessary. SkEye uses a weighted
average of the alignment points, with the alignments nearest to current
location having more weight.
TIP: Here is a typical observation session: Let's say I have made the first alignment to Sirius. Now, I try to find M33. But first, I will check the alignment in this direction. I see that there is a nearby star called Mirach. I get it into the FOV, and observe that Mirach is slightly off-center on the phone. I Insta-Align to it. When I push to M33 using
SkEyeI see it right in the center of the FOV.I can now find several objects in this part of the sky without further alignments. When I move to another part of the sky, it is time to check the alignment with a nearby bright star and Insta-align if needed.
Not all metals are problematic. Read the note on substances that cause interference.
GyroAssist
Version 9 of SkEye introduces a new feature called GyroAssist. When enabled,
SkEye will use the gyroscope to calculate the real time pointing in aligned
mode. The error prone IMU sensors (such as magnetometer) are only used for
initial bootstrapping of the alignment.
The feature is enabled by default whenever the gyroscope is available. It can be turned off with a simple toggle button. When off, the older alignment system, that uses IMU sensors, kicks in.
The Gyroscope is more accurate than other IMU sensors over a short period of time (ranging from a minute to twenty minutes).
Alignment procedure
While the alignment procedure remains the same as before, the "style" of
alignments needs to be a little different when using GyroAssist.
The Gyroscope is accurate only for short durations of time, ranging from a minute to about 20 minutes.
Hence, to make the most of this feature, you need to find the target quickly after an alignment. In case a lot of time elapses from the previous alignment, it is advisable to add a new alignment to a star nearby your target, before hopping to the target.
Visibility Measures
Since Astronomical objects come in various shapes, sizes, energies and distances from us, there is a lot of variance in their ease of observation.
Some are bright enough to see with the naked eyes, such as
- the Sun and the Moon
- nearby planets in our solar system including Mercury, Venus, Mars, Jupiter and Saturn
- thousands of bright stars in our stellar neighbourhood
- the Andromeda Galaxy
- the Orion Nebula
- the spiral arms in our galaxy, the Milky Way
Other objects are within the reach of amateur astronomers but require aides such as a camera, a telescope or a pair of binoculars.
Knowing the visiblity measures of the objects as well as the capabilities of your observing equipment, will help you plan your observation sessions.
For the purposes of Amateur Astronomy, two visibility measures are typically used:
- Apparent Magnitude
- Surface Brightness
Each measure is suitable to compare different types of objects, and SkEye uses the most suitable measure automatically for a given object.
Apparent Magnitude
Apparent Magnitude is a measure of the brightness of a star or other astronomical object observed from the Earth. An object's apparent magnitude depends on its intrinsic luminosity, its distance from Earth, and any extinction of the object's light caused by interstellar dust along the line of sight to the observer.
This visibility measure is best suited for point sources of light, such as stars and open clusters.
The magnitude scale is reverse logarithmic: the brighter an object is, the lower its magnitude.
Examples
| Object | Apparent Magnitude as seen from Earth |
|---|---|
| Sun | −26.74 |
| Full Moon | −12.90 |
| Jupiter | −2.20 |
| Vega | +0.03 |
| Saturn | +0.46 |
For extended and fuzzy objects, such as galaxies and nebulae, the Apparent Magnitude is calculated as the integrated magnitude for the angular area subtended by the object. It is not directly useful as a visibility measure for such objects since information about the size of the object is lost.
Surface Brightness
Surface Brightness is defined as the Apparent Magnitude per unit angular area of an object.
Since the area is accounted for, it is suitable for comparing visibility of extended and fuzzy objects.
Examples
A truly dark sky has a surface brightness of 21.8 Mag/arcsec2. The peak surface brightness of the central region of the Orion Nebula is about 17 Mag/arcsec2.
Magnetometer
This is a sensor that measures the magnetic field around your Android device. It is equivalent to the magnetic compass that is used for navigation.
If your device has this sensor, SkEye can autoscroll the map as you point the device to a location in the sky. It can also help guide a telescope via the feature called Virtual DSC.
Magnetometer Calibration
The magnetometer on some phones requires to be calibrated. This needs to be done every time you use any app that needs the magnetometer!
Calibration procedure
The procedure is very simple and takes just a few seconds. After starting the application, wave your arm holding the phone in a figure-8 motion. You may have to repeat this a couple of times.
This is best illustrated with a video.
If you can't click the link, try searching
YouTubefor “best compass calibration method”.
After doing so, check whether North as shown in the app, is approximately where you think it is. (If the sensors are not calibrated, you will see really wild errors that are easy to notice).
Sources of errors
Magnetometers sense the direction of Earth's magnetic field to provide orientation. There are various errors introduced at this stage:
-
The Earth's magnetic field itself is not consistent. It varies from place to place, and time to time, quite unpredictably. The major components of the variation are more predictable and taken care of but smaller components aren't.
-
There is often some magnetic interference from the environment, such as large metal structures, electric circuits, underground metal deposits, and so on.
-
Some phones induce a magnetic field around themselves, affecting their own sensors.
Substances that cause interference
Every substance interacts with ambient magnetic fields (such as the Earth's magnetic field) in a unique way. Their level of interaction is measured by the “relative magnetic permeability” of the substance. Higher the value, the more the substance distorts ambient magnetic fields. The relative permeability of some materials can be found in this wikipedia article.
Among the commonly found materials the following are relevant to us:
- Iron
- Nickel
- Cobalt
- Alloys of the above. For example, Steel.
All other materials don't pose a problem. Examples are:
- Aluminum
- Copper and it's alloys like Brass
- Wood, Plastic and most of the other commonly found substances
The "Strange Magnetic Field" warning
SkEye shows a warning if abnormal magnetic fields are detected.
If you see this warning then, firstly, "Don't Panic"!
This message is shown when the difference between the detected field strength and the expected Earth's magnetic field strength is higher than usual at your location. The sensors are quite sensitive, so the difference is often negligible for day-to-day activities. But it could be substantial for navigation / sky map pointing.
There are couple of things you can do if you see this message:
- Try calibrating the magnetometer as described above.
- Try observing from a different location. You might have to go outdoors, far from interfering gadgets, transmission wires, etc.
- Check if your device has a cover with a magnetic button. You might have to discard such a cover.
- Check if you have specified your location correctly. The strength of the Earth's magnetic field is not constant; it varies by time and place.
- Check the system date on your device.
- If nothing else works, the magnetometer might be faulty. If you have access to another device, try running SkEye on it from the same location.
Managing system time
The accuracy of the phone's system time is important for all planetarium apps. It is especially important in the case of SkEye since it uses real time object locations for alignment. If the time is wrong by a few minutes the errors add up, sometimes up to several degrees of bearing.
Android doesn't let applications change the system time. There are two choices to the user for setting the system time:
-
Automatically set to network provided time (the mobile carrier network, not the Internet).
The problem with this is that the network's time may not be accurate or may not even exist in certain parts of the globe.
-
Set to the time manually.
The problem with this is that the timer may drift over a period of time. So you will have to periodically check and reset the clock.
To check how accurate your system time is you can use a GPS app or the Clock Sync app (former uses GPS time while the other uses the Internet to access the atomic time).
I recommend the Clock Sync app. If you have a rooted phone, this app can automatically sync the system time to the atomic time. Otherwise, you have to manually adjust the time with the aid of prompts from the app.
Adjusting Sensitivity
First, open the Map screen and calibrate the sensors with a figure 8 motion. Now
observe the display for a few seconds.
In case of too much jitter, keep the phone on a level surface.
-
If the jitter is such that the display rotates around the Nadir, then you need to reduce sensitivity of the magnetometer.
-
If the jitter seems random, then you need to reduce the sensitivity of the accelerometer.
On the other hand, if there is too much lag, determine the direction of the lag.
-
If there is a lag when moving along the horizon (azimuth change), you need to increase the sensitivity of the magnetometer.
-
If there is a lag when going from horizon to Nadir (altitude change), then you need to increase the sensitivity of the accelerometer.
Co-ordinate systems
There are two commnly used co-ordinate systems in astronomy.
Equatorial co-ordinates
This system is aligned with the celestial equator.
| HA | Hour Angle |
| RA | Right Ascension |
| Dec | Declination |
Horizontal co-ordinates
This system is aligned to the horizon plane of the observer.
Notes
This chapter includes
- notes,
- tips,
- trouble shooting articles and
- FAQs.
Fewer Objects in Pro Version
There are actually two reasons for this.
Catalog filters
Since the number of objects in the Pro version's database is large, the default setting for the catalog filter only shows a subset of objects. This often confuses new users of the Pro version, since they can't find objects that are visible in the Free version.
You can tweak the filters to suit your needs from the Catalog Filters screen.
More organised database
The NGC and IC catalogs include a number of miscellaneous or ill-categorized objects, which are not enabled by default.
To enable them you can pin them from the Catalog Filters screen.
Catalog updates by user
From version 8.0, the user can update the Custom Catalog.
The ability to update Satellite and Comet catalogs will be added soon.
Note: This feature was not implemented earlier, because early versions of Android required the app to request "File and Storage" permission. But more recent versions of Android don't have this limitation, and hence the ability to update data is now being built into SkEye.
Software Requirements
- Android 8.1+
Hardware Requirements
- For autoscroll,
accelerometerandmagnetometerare necessary. Agyroscopeis optional, and can help reduce jitter.
Changelog for the 8.x series
Note: New releases mentioned here might take a few days to be available to everyone in the Play Store.
SkEye 9.0.5
Feb 2023
- Improvements to the Telrad (Cross-hair) labels. They are now more opaque (brighter) than the circles, and the font size has been increased too.
- The Diameter sign (⌀) is now shown beside the angle shown on the Telrad circles. This is to avoid confusion between radius and diameter of the circles.
- Fixed UI height in landscape screen orientation
- Fixed display of RA co-ordinate when TimeMachine is active in Manual scrolling mode
SkEye 9.0.4
Jan 2023
- Fix Calendar View's week display. Sometimes the Sunday column, which is supposed to be the first column, was shifted to a different column.
SkEye 9.0.0
Nov 2022
Introducing a new feature called GyroAssist. When enabled, SkEye will use the gyroscope to calculate the real time pointing in aligned mode. The IMU is only used for initial bootstrapping of the alignment. The feature is enabled by default whenever the gyroscope is available. It can be turned off with a simple toggle button.
The Gyroscope is more accurate than other IMU sensors over a short period of time (ranging from a minute to twenty minutes).
Changelog for the 8.x series
Note: New releases mentioned here might take a few days to be available to everyone in the Play Store.
SkEye 8.5.5
Release Date: 18 Oct 2021
Note: This version changes the rendering functionality and I could only test this on Android 8.1+ devices. Hence this release has been made available only for Android 8.1+ devices. After more testing, updates will be resumed on older Android devices.
- Faster GPS fix by using network assisted GPS when available
- Better on-boarding experience for new users
- Internal changes: Started moving to a new app and UI architecture
SkEye 8.4.0
Release Date: 13 Sep 2021
- Relative Scale of Stars in Map settings
- Larger Star database
- pro version: 400k stars, 11.5 mag (full Tycho2 catalog)
- free version: 200k stars, 9.5 mag
SkEye 8.3.6
Release Date: 23 Feb 2021
- Proper fix for startup bug in some Android launchers, and in other apps that use SkEye API
- Meteor catalog: added
Lyrids, corrected date forEta Aquariids - Altitude Plot: Highlight the
current timeline
SkEye 8.3.5
Release Date: 21 Feb 2021
- Altitude Plot: Fixed position error of background color
SkEye 8.3.4
Release Date: 19 Feb 2021
- Defensive fix for startup bug in some Android launchers
- Altitude Plot: Tweak the Sun background color
SkEye 8.3.3
Release Date: 17 Feb 2021
- Optimisations to reduce CPU usage
- Tweaks:
- Satellite label colors are a bit more prominent now
- Satellites below horizon are now less prominent compared to those above horizon
SkEye 8.3.1 and 8.3.2
Release Date: 16 Feb 2021
These are bug fix releases. There's also a small tweak to the color of the Telrad.
SkEye 8.3.0
Release Date: 15 Feb 2021
- Object Details Dialog
- Show Altitude Plot
- Fixed the Wikipedia link in the Free version
- Custom Catalogs now have map settings for:
- Label Scale and Opacity
- Marker Opacity
- Accuracy:
- The computations for Precession of Earth's axis are now consistently performed for all catalog objects.
- Comet orbits are now computed with more accuracy
- Tweaks:
- New icons for the app
- Changed look of catalog labels and lines
- Changed look of ecliptic line
- Bug Fixes:
- Fixed searching of star by designation (example query:
beta mon) - Ensure manual mode is not exited automatically
- Ensure colors are rendered correctly under Dark Theme on Android 10+
- Fixed searching of star by designation (example query:
SkEye 8.2.0
Release Date: 20 December 2020
- Object Detail Dialog
- Clicking an object on the home screen now shows the details of the object, such as
- Type
- Magnitude / surface brightness
- Distance from Earth
- Equatorial and Alt-Az co-ordinates
- A button to search within the App
- A button to search Wikipedia
- Object detail button is also available on the Map screen
- Clicking an object on the home screen now shows the details of the object, such as
- Reduced crowding of labels by dynamically showing and hiding them
- Updated translations. New language: Telugu
- Fixed rare crashes in Map screen
SkEye 8.1.1
Release Date: 1 December 2020
- Fix a crash when starting to add an alignment but canceling it.
- Updated Spanish translations
- The default FOV was changed from 30° to 45°
- Tuned default map settings. Colors of ground and horizon are now muted and more transparent.
SkEye 8.1
Release Date: 29 November 2020
- Alignments are now persistent. They will be restored even after the app / device restarts. To keep the interface simple, alignments will automatically expire after 18 hours.
- Alignments are now associated with the location. So you can view the map for a different location and then return back to your current location to resume with the alignments.
- A list of popular cities has been added to make it easy to add a new location. The wait for satellite navigation or manual entry can now be avoided for these cities, when accuracy is not essential.
- Translations have been improved. If you would like to contribute translations in your language, please visit this easy-to-use website.
SkEye 8.0.2
Release Date: November 2020
- New theme: Green. This was requested by some users, as it apparently helps observing in Moonlight. Plus, it looks cool!
- In free version: Ability to contribute to the development via in-app-purchaes. This is entirely optional and doesn't affect functionality in any way.
SkEye Pro 8.0.0
Release Date: October 2020
- New feature: Custom catalog
- This catalog can be populated by importing from a CSV file.
- New feature: Pinned objects
- Objects from Messiers, NGC and IC catalogs can be pinned. Pinned objects are always selected irrespetive of the filter setting.
- Improvements:
- Landscape layout for catalog filter
- Many cosmetic tweaks to catalog filter dialog
- Labels for stars are drawn at a distance if they are very near to DSOs. (Previously only DSO labels behaved this way).
See
MirachandMirach's Ghostfor example.
- Bug fixes:
- Some Labels were not being drawn at high zoom level.
- In rare cases, switching from automatic mode to manual mode was not working.
Changelog for the 7.x series
7.3.2
Release: September 2020
- Home screen:
- Tweak: Increased the number of objects displayed in "What's up now?" list
- Bug fix: Settings button was not clickable in landscape mode
- Map Screen:
- Bug fix: NGC catalog labels were not correctly displayed in Free version
7.3.1
Release: September 2020
- Home screen:
- Optimise the screen layout for landscape mode.
7.3.0
Release: September 2020
- Map screen:
- Quick settings has been renamed to map settings
- Labels can now be scaled through map settings
- Show sub-directions (North-West, etc) on the map
- Allow wider FOV
- Smoother time machine animations
- Home screen:
- added search button
- added about button
- Search screen:
- Sort by "ease of viewing" now ensures that objects that are below the horizon are always shown lower in the search results
Free version
- Expanded NGC catalog to include 200+ popular objects
- Common names for NGC catalog are now shown
Pro
- Catalog filter screen now shows number of selected objects
- Home screen now shows total number of selected objects
- Update NGC and IC catalogs to latest revision
Details
- Map screen:
- Labels automatically scale based on FOV
- Increased constellation line size
- Fix corruption of labels at the edges
- Removed "about" option in map menu
- Smoother rendering for Labels
- Tweaked the position of Cassiopeia label