SkEye Cam Guide
Written for SkEyeCam version 2.2
May 2024
Introduction
SkEye Cam is a camera app for Android phones with dedicated features for observational astronomy and astro-photography.
Highlight features include:
- Live Plate Solving
- Polar Alignment
- Long exposures, longer than advertised by the camera API
- Various capture formats, including RAW, YUV and JPEG
- Live De-Bayered view of RAW images
- Batch Capture mode, similar to an Intervalometer
More features will be coming soon, including:
- Time Lapse recording
- Stacking, with alignment, or with trails
- Support for external cameras
- Saving of images in PNG 16 bit, with EXIF information
Focussing
In Astro-photography, we typically want to focus the camera to infinity. This is not as easy as it sounds since most smartphone lenses don't have a calibrated focussing mechanism. Moreover, you might have an additional lens or mirror in the light path, which will affect the focussing. Hence, simply moving the focussing slider towards infinity will not ensure good focus.
A Bahtinov mask would have made focussing easier, but making one for a smart phone camera is difficult, since the aperture is usually too small to make a mask. Instead, we have to manually eye-ball the focus and here's a guide to getting good results.
Keep the phone on a steady mount
A steady mount is crucial not just for focussing but for all Astro-photography.
A tripod, or a telescope mount, or even propping against a rock will do.
Choose a bright star
To minimise the effects of camera shake, seeing and trailing, choose a bright star and reduce the exposure time as much as possible. If needed, bump up the ISO instead of the exposure time.
Double tap to zoom in
In SkEye Cam, when you double-tap on the image preview, the view will zoom 4x on that part of the image. You can double-tap again to reset the zoom. You can also use two-finger gestures to zoom and pan the image.
Now, zoom-in on the bright star, and adjust the focus slider till you can verify the star appears as small as possible.
Plate Solving
Plate solving, once enabled, is automatic. But for good results, you need to first calibrate the system.
Checklist
- Use a steady mount for the device
- Set your location
- Ensure the stars are in focus. See the focussing guide for tips.
Choose a familiar part of the sky
You should be able to easily recognize constellations and asterisms in that part of the Sky.
Set the exposure and ISO
Enter the LiveView mode and bump up the ISO and lower the Exposure time as much as possible, while ensuring that bright stars are easily visible. Ideally, the brightest stars should be saturated (appearing fully bright on the screen).
Start calibration
To start calibration, pause the capture and then select Menu -> Calibrate.
Step 1: Set the margin
Margin Specifies a space around the borders of the image. Anything outside this margin will be cropped out and ignored.
This is useful to eliminate trees, buildings and other terrestrial objects, so as to reduce the chance of false positives during star detection.
A margin of about 5% is typical and recommended.
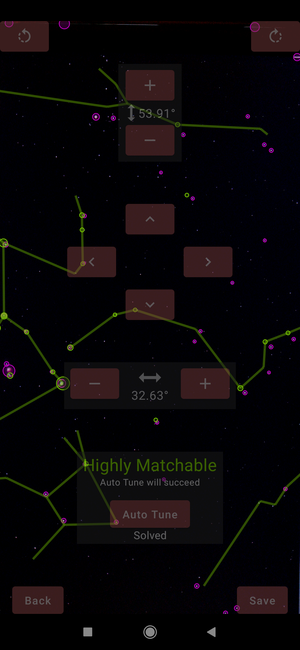
Step 2: Calibrate the FOV
An overlay of constellations, stars and other objects will be shown on top of the detected objects.
Try to match the overlay with the detected objects. When the system is able to recognize the pattern,
it will say Matchable.
Now, click Auto-Tune to let the system figure out the exact match.
After Auto-tune is successful, click Save
Enable Live Plate Solving
After calibration, enable "Live Solving" to solve images as soon as they are captured.
Ensure that the capture settings are similar to the capture settings that were used for calibration. This restriction may ease in a future version, but as of version 0.9, please use similar settings.
The solution is only visible as an overlaid map for now. More details like RA, Dec will be shown in a later release.
Polar Alignment
This feature helps you align an equatorial mount to Earth's rotational axis. It will also work with other similar instruments such as equatorial platforms, barn-door mounts, etc.
What is Polar Alignment?
Due to Earth's rotation around its axis, the objects in a telescope's or camera's field of view will appear
to move even though the telescope itself might be stationary. To compensate for this motion, a corresponding
movement needs to be made on the mount. This compensatory movement is called tracking.
To help with tracking, equatorial mounts and similar instruments have an axis that needs to be aligned with the Earth's axis of rotation. The lesser the alignment error, the lesser will be the tracking error.
Let's define RA axis of mount as the axis on which the mount is intended to rotate such that only the Right Ascension
of the target changes. This is the axis that needs to align with the Earth's rotational axis, which is marked by the two
Celestial poles.
Similarly, the Declination axis of mount is the axis on which the mount is intended to rotate such that only the Declination
of the target changes.
How to Polar Align
To Polar Align with this app, follow the steps below.
Checklist
- Ensure the location in the app is set accurately.
- Ensure Plate solving is working. See this page for more details.
- Roughly align the mount. While not strictly necessary, it will help reduce ambiguities. An alignment within 45° of the celestial poles is good enough and should be easy to achieve by just eye-balling it.
- Physically attach the Android device to the OTA or mount. It can be attached in any convenient orientation, as long as the camera points towards the sky.
Start the alignment
- In the live view screen, press pause, and bring up the
Menu - Click
Start polar alignmentbutton - You will be greeted by a screen such as the one shown below.
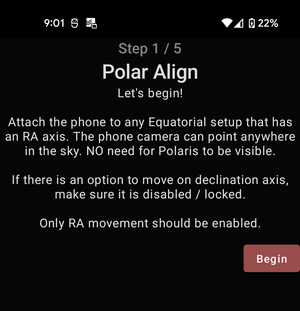
- You will be walked through a number of steps, including,
- Locking the declination axis
- Rotating on the RA axis
- Locking the RA axis as well
- And finally, the alignment screen shown below:
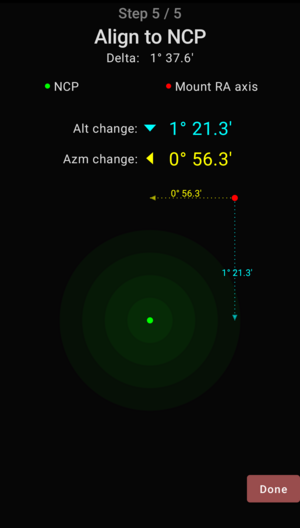
This screen indicates the degrees by which the mount needs to be adjusted, so that it is fully aligned. While you move the mount, the screen keeps updating with the latest measurements.
When you are happy with the alignment, you can click the Done button to exit.
Live View
In this mode, the app captures images continuously and displays them on screen. The image can be zoomed or panned.
The capture can be paused and resumed. While paused, the latest image can be saved as a PNG file.
The cross-hairs can be moved to mark an alignment with a telescope or binocular. Plate Solving can be enabled to show an overlay of detected objects.
Prep screen
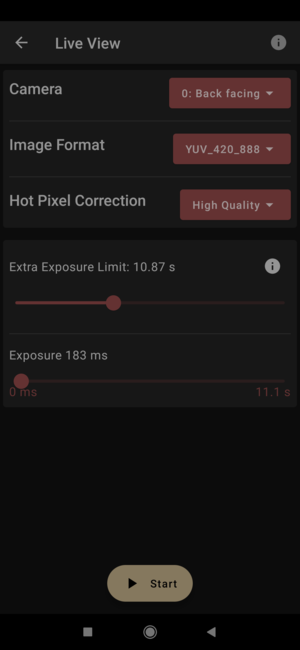
Before entering the live view, you are shown a screen that lets you choose:
-
Which camera to use (front-facing, back-facing, etc)
-
Capture Format (RAW, YUV, JPEG)
-
Extra Exposure Limit.
This specifies how much to extend the limit advertised by the Camera. Use this with care. Start with a low value and then gradually increase it. A very high value might cause the app to crash.
-
Exposure
This is the initial value for the exposure. Can be changed later.
Live View
Once started, the camera continuously captures images and a view of the latest image is shown.
- Click pause button to pause the captures.
- Click the "Gear icon" to change the settings like Exposure, ISO and Focus.
- You can zoom and pan using touch gestures, similar to the Gallery app in your device. This is useful when adjusting the focus or aligning the cross-hairs precisely.
- Double tap anywhere on the image to zoom on that region. Double tap again to reset the zoom.
- When paused, the following options are available in the menu:
- Calibrate Plate Solving Engine
- Enable Live Plate Solving
- Unlock cross-hairs. This will let you drag the cross-hairs to a new location. When done, you can lock it back.
Plate Solving Calibration
The Plate Solver engine works in three steps:
- It first crops the image according to configured
Margin - It then detects star or planet shaped objects in the image.
- It then uses these detected objects to "solve" the direction in which the camera was pointed. For fast solving, this step requires the FOV of the image to be configured.
Step 1. Cropping
Adjust the margin to crop out any foreground objects, such as trees or buildings.
Adjust the gradient removal strength to remove the effects of light pollution.
Step 2. Detection (automatic)
The detection happens automatically using Neural Networks.
The detected objects will be marked with Magenta circles.
Step 3. Solver calibration
This screen might look intimidating at first, but don't worry, the idea is simple. And you only need to do this once.
The engine will make a guess and show where it thinks the camera is pointing. A map of stars and constellations will appear super-imposed on the detected objects.
If this guess looks right, that is, the objects are very nearly matching, you can "Save" the calibration.
Otherwise, you can use touch gestures to adjust the position. You can move the guessed position, or rotate it. You can also zoom in or out by adjusting the FOV.
When the position looks nearly aligned you can use the Auto-tune button. When it says Matched the overlay will turn green.
When everything looks satisfactory, click the Save button. The calibration will be remembered until it is over-written by a new Save.
Changelog for the 2.x series
2.3.0
July 2024
- New: Show North and South Celestial Poles on the plate solved overlay
- Improvement: Account for precession of equinoxes. This makes the above NCP/SCP overlay possible while also improving the accuracy of polar alignment.
2.2.9
June 2024
- Fix: Location of unnamed stars in Live Plate Solve result
2.2.8
June 2024
- Fix: Crash during app startup in rare cases
2.2.7
June 2024
- Fix: Location of named stars in Live Plate Solve result
- Feature: Preview during local plate solve can now be panned and zoomed
2.2.6
May 2024
- Tweak color of cross-hair lock button
2.2.0
April 2024
- New feature: Solve local images and export the solution as animated videos
2.1.0
Jan 2024
- Locations can now be named, edited, and multiple locations can be stored, similar to the SkEye app.
2.0.0
November 2022
A new feature called GyroAssist uses the gyroscope to predict the position of the view when plate solving fails.
This feature lets you continue using the app as a PUSHTO guide, even when a problem occurs in plate solving. This can happen, for example, when an image gets clicked during telescope movement, since the image can get "motion blurred".
Changelog for the 1.x series
1.0.1
October 2022
Improve the performance of star detection by fixing a silly bug in the Neural Network code.
1.0.0
October 2022
A simplified calibration procedure, that automates star detecting using Neural Networks and automatic histogram analysis.
Because the detection is automated, there are fewer parameters that need to be explicitly specified by the user.
Moreover, the same calibration settings can be used for a variety of capture settings like Exposure and ISO.
Changelog for the 0.x series
0.9.1
January 2022
- Improve the Polar Alignment UI
- Improve the accuracy and speed of Geometric calculations
0.9.0
- Add support for Polar Alignment
0.8.1
- Message to indicate calibration is required before plate solving
- For front facing camera, mirror the display to help move the telescope
0.8.0
- Cross-hair offset is remembered per camera, while the app is running
- Support cameras with 270° rotation
- Better stability in handling various configurations of IMU sensors
0.7.0
September 2021
- Catalog objects: Messier and a selection of bright NGC objects
- remember preference for Live Solving check box
- better labels and markers when zooming in on live view
0.6.11
September 2021
Batch CapturemodefixLive view: show solver result only if live solve is enabled
0.6.10
Release: August 2021
- Improved gradient filter. It will now be more effective against clouds, while making the stars brighter.
- [Fix] Zoom on camera view now applies to overlays as well.
0.6.9
Release: August 2021
- Ability to zoom and pan the camera view using gestures
- Ability to zoom, pan and rotate the view using gestures, in FOV calibration screen
0.6.8
Release: July 2021
- Fix YUV mode in some devices
- Cross-hairs:
- button to lock the cross-hairs directly
- slider for opacity
0.6.7
Release: July 2021
- Added Cross-hairs for alignment
0.6.6
Release: July 2021
- Fixed a bug in saving calibration; it was saved but not used for the current session!
- Added two new calibration features:
- Margin (aka Crop)
- Gradient removal
0.6.5
Release: July 2021
- Portable implementation for YUV decoding that works on more devices
- Show a progress bar for detected sources
- Other minor UI updates
0.6.4
Release: July 2021
- Correction for lens deformation. Automatically done during calibration.
- Fixed a bug in saving calibrations
0.6.3
Release: July 2021
- show world map in location screen
0.6.2
Release: July 2021
- tweaks to menu and location ui
- make calibration UI collapsible
0.6.1
Release: July 2021
- Optimisations to the solver engine
- Tweaks to the Solution display
0.6.0
Release: July 2021
- Assumes square pixels always. This reduces the solve time as well as the UI complexity during calibration.
- Various improvements to calibration UI
0.5.6 to 0.5.9
Release: July 2021
- When saving image
- add UTC timestamp to overlay
- add seconds to suggested file name
- Reduced memory usage drastically
- Display star names in solution
- Catch any exceptions in background tasks and show a debugging dialog
- Fix exception when storing on GDrive
0.5.5
Release: Jun 2021
- Fix solving issue when threshold is high (greater than 120)
- Optimised memory usage during source detection
0.5.4
Release: Jun 2021
- Fix YUV banding issue on some phones
- UI Tweak: Plus/Minus Buttons on Detector calibration screen
0.5.3
Release: Jun 2021
- Disable the noise estimator, as it clashes with the Calibration process
- UI Tweak: Colors indicating match in Calibration UI are more contrasting now
0.5.2
Release: Jun 2021
- UI fixes: Further improvements to Slider Behavior
0.5.1
Release: Jun 2021
- UI fixes: Improved Slider Behavior
- UI improvement: Show area in pixels
0.5.0
Release: Jun 2021
- Enabled Plate Solving