Virtual DSC
This feature helps convert your telescope into a PUSHTO telescope, easily and quickly, with a fair level of accuracy.
You just need to mount your Android phone on the Telescope's OTA, and add one alignment.
What is DSC?
DSC stands for Digital Setting Circles. Real DSCs are implemented using optical or magnetic encoders in the mount
and are quite accurate (typically within 5 arc-minutes on an amateur setup). However they are costly and cumbersome to install.
In contrast, the Virtual DSC mode in SkEye uses only the sensors in your device, and installation is much easier.
Advantages over a real DSC
-
Cheaper (if you already own an Android device)
-
Isn't affected by mounting errors.
-
Quicker to install and get started
-
Less messy (no wires, batteries, etc)
Disadvantages
Although, complete accuracy is possible under ideal conditions, in reality, there are errors introduced from
the sensors. Hence, Virtual DSC can sometimes be less accurate than a real DSC.
The main source of the inaccuracy is in the magnetic field measurement. See the chapter on Magnetometers for more details.
SkEye 9.x has a new feature called GyroAssist which improves the accuracy by using the Gyroscope to predict the pointing. The Gyroscope tends to have better accuracy over a short time period, ranging from a minute to about 20 minutes. This still depends on the magnetometer for initial bootstrapping of the alignment, so there is a still an element of inaccuracy in the system.
Despite the errors, I have found this method to be accurate, at times, to about 15 arc-minutes with single point alignment.
More typically, you can expect about half-degree (30 arc-minutes) accuracy with a well planned setup and under ideal conditions. YMMV!
For best accuracy, you can consider using the SkEye-Cam app instead, which "solves" the images captured via the camera.
Tutorial for Virtual DSC
Since SkEye is the only application (that I know of) with a Virtual DSC
feature, here's a detailed step-by-step guide for using it. It's
actually quite simple to use once you get familiar with it.
Prepare your phone
-
Make sure the phone's system time is accurate to within a minute (if not seconds). You can use, for example, the Navy Time application to verify system time accuracy. (See Appendix A for more details)
-
Start the
SkEyeapplication and setup your location accurately. -
Calibrate the magnetometer as described in this section.
-
Now attach the phone to the OTA, as described below.
Attach to telescope
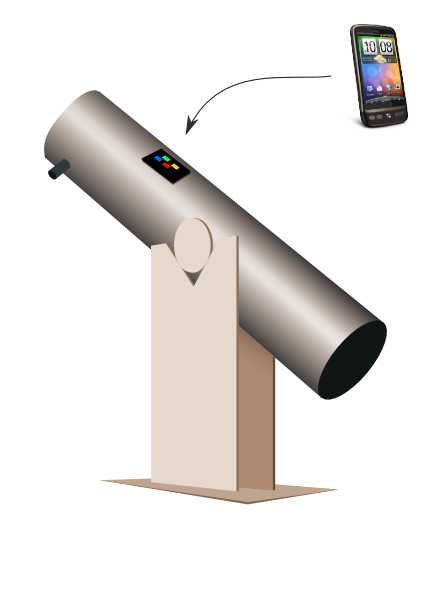
- You need to attach your phone to the telescope's Optical Tube Assembly (OTA), such that the phone moves whenever the OTA moves. See figure below for an example.
-
You can use a phone jacket (or case, holster, etc) and attach the jacket permanently to the OTA. That way, you can “plug-in” the phone quickly when needed. To attach the jacket to the OTA you can use, for example, Velcro or two sided tape.
Checkout several ideas contributed by users on my website.
-
The direction in which you attach doesn't matter. The type of mount doesn't matter either. Attach in such a way that the display is conveniently visible and operable.
-
You will get best results if your telescope doesn't have steel1 tubes or mounts, since they cause magnetic interference. If they do, try to attach the phone farthest from the metallic content.
-
Try to observe from a location where there is little magnetic interference, for example, keep away from electric poles and wires, large buildings or steel railings.
First Alignment
Choose a bright and well-known star/planet for your first alignment.
Click Menu button → Indirect Mode → Add new Alignment. You will see a
list of objects sorted by their “ease of viewing”. SkEye prioritizes
objects by their current altitude and visual magnitude.
Chose one of these objects and a dialog will show up asking for confirmation:
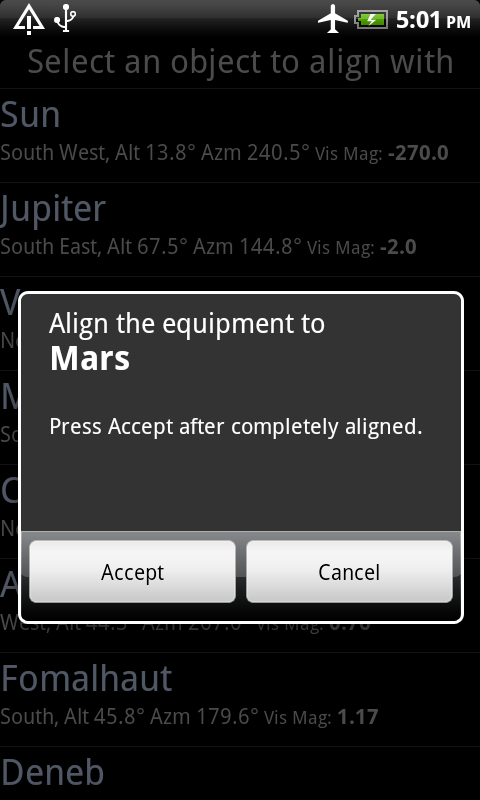
Now move your telescope so that this object is centered in the field-of-view. Only then, press Accept. Keep the telescope stationary for a few seconds, after clicking Accept. The alignment is done!
To help you to center the star in the field-of-view you can use an illuminated reticule eyepiece. If you don't have that you can use a high-power eyepiece and defocus it so that the star appears like a blob. Centering a large blob of light is easier than centering a pin-point source of light.
When you return from the Indirect-mode screen to the Map screen, the object you selected in the previous step should now appear in the center of the cross-hairs.
If you move the telescope now, you will see the display changing in tandem! You can now try finding a few objects or do more alignments as described in the next section.
Adding more Alignments
You can add more alignments by repeating the procedure above, but SkEye
offers a quicker way to do this: Insta-Align. Here's how you use it.
Slew your scope to find another bright object. If there is a difference between the scope's view and the planetarium's view, you can simply drag the view until it is centered in the cross-hairs. The words Insta-Align will be shown along with a couple of buttons as in the figure below:
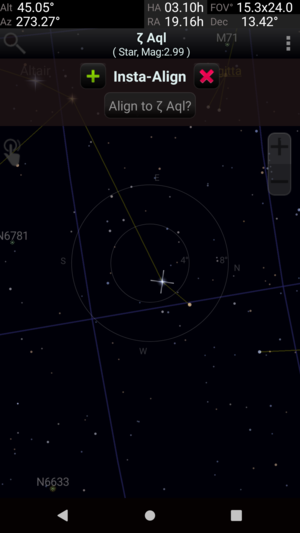
Once the object is centered, press the “+” button and you are done!
As a further shortcut, SkEye will show a button to align to the nearest
object. For example the “Align to Pollux” button in the figure. This is
handy and more precise than relying on your eyes to match the
cross-hairs.
To cancel the alignment procedure you can click the red “X” button, or simply move the telescope away.
You can add as many alignment points as necessary. SkEye uses a weighted
average of the alignment points, with the alignments nearest to current
location having more weight.
TIP: Here is a typical observation session: Let's say I have made the first alignment to Sirius. Now, I try to find M33. But first, I will check the alignment in this direction. I see that there is a nearby star called Mirach. I get it into the FOV, and observe that Mirach is slightly off-center on the phone. I Insta-Align to it. When I push to M33 using
SkEyeI see it right in the center of the FOV.I can now find several objects in this part of the sky without further alignments. When I move to another part of the sky, it is time to check the alignment with a nearby bright star and Insta-align if needed.
Not all metals are problematic. Read the note on substances that cause interference.